As an indoor gardening hobbyist, I like to find out the optimal ways of DIY-ing an indoor vegetable garden system. How to construct an indoor gardening system from scratch? How to get harvests in the most economical way possible? Today, I’d like to talk about my experience in constructing an indoor gardening system that is capable of growing lettuce and basil together. Why lettuce and basil? These two plants are the easiest to grow and the least susceptible to mistakes according to my research. I have a feeling that with this achievement under my belt, I will have more self-assurance growing other plants down the road.
Essential tools for your hydroponic system
1. Seedling tray, spray bottle, pH adjustment solution, pH meter
Seeds cannot be directly planted in the hydroponic system, so we need to begin with seedlings. I utilized a recycled partitioned food plastic box as the seedling tray. Next, How to adjust pH for hydroponics? There are no special products needed to purchase; lemon juice will raise water acidity, and baking soda will raise alkalinity.

2. PVC pipes + end caps
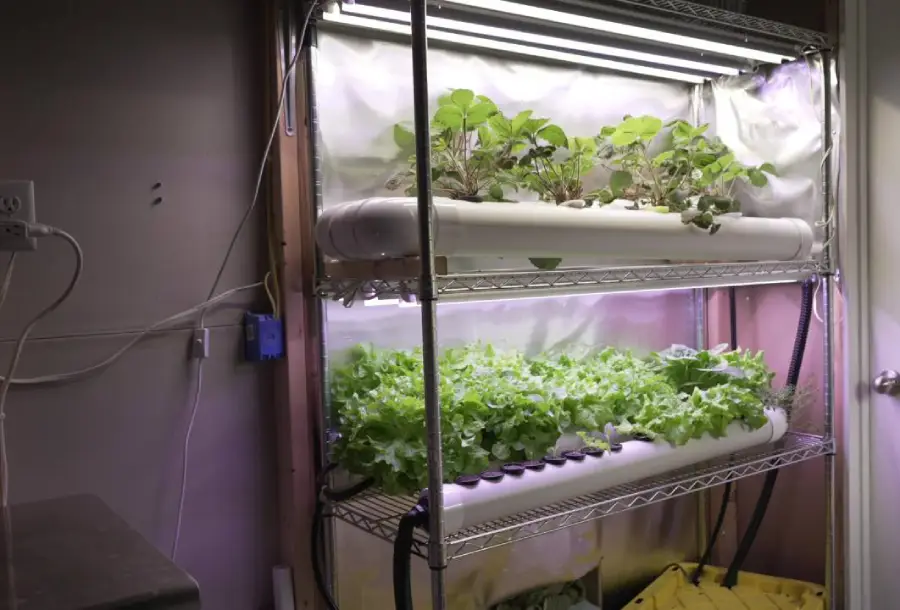
I employed two PVC pipes of 15 cm diameter and 1 meter length to make a two-layer NFT pipe system. In the top layer will be basil, and in the bottom layer will be lettuce. These two crops have shallow roots, so 15 cm is enough. Typically, the arrangement of the plants in the top and bottom layers is according to the amount of light needed, but my flat does not receive intense natural light, so I illuminate them with LED lights. If there were natural lights, basil would still be on the top layer and lettuce on the bottom layer.
Also, I had previously found that black PVC pipes can prevent light from entering, thereby inhibiting the growth of algae. But since I lacked black PVC pipes, I used white ones instead.
3. Hose + silicone sealant
A 2-meter hose links the water pump to the upper PVC pipe, followed by the lower PVC pipe, and lastly to the bucket.
4. Water pump
I measured the height of the mounted frame to be approximately 1.2 meters, so selected the water pump with the slightly greater head of 1.5 meters. The 18W power rating of the pump is appropriate for my small hydroponic system. I also took special note of this pump’s noise reduction quality. In reality, there is some noise, keeping in mind that I have limited space to live, but I have minimized its impact to the barest.
My water pump has a timer and can be programmed to pump the water. I have set it to pump the water for 15 minutes at an hour during the day and every 2 hours at night time.
5. Water bucket
A bucket of 20 liters is used to hold the nutrient solution. I preferred a brown one to prevent algae growth.
6. Nutrient solution
I purchased the nutrient solution directly from Amazon. When selecting a nutrient solution, the most important parameters to consider are its nutritional content, pH, and EC value. For basil and lettuce, some of the nutrients required are nitrogen, calcium, potassium, and magnesium. The pH should be 5.5-6, and the EC value should be 1.2-2.0 mS/cm. The EC level needs to differ based on the plant’s growth stage. I will use a less concentrated nutrient solution for the first growth stage. One can use a pH meter and EC meter to be accurate.
7. Plastic cups
Based on the growth spacing of lettuce and basil, I estimated that I can fit 6 plants in each PVC pipe. I thus ready 12 plastic cups. Naturally, they are also opaque, as I want to do everything I can to prevent algae growth, as it would be highly inconvenient to clean it.
8. Growing medium
Appropriate growing mediums for hydroponics are perlite, coconut coir, and rockwool, which are ideal in both water retention and aeration. Perlite and rockwool were used as the growing support mediums for lettuce and basil.
9. Iron frame
Others use PVC pipes directly as frameworks, but I was worried about stability and made an iron frame with two layers using iron pipes. The framework stands 1.2 meters high and is a bit wider than the PVC pipes.
10. LED grow lights
Each growth stage of a plant requires a varied light spectrum, so I bought Casyoo’s adjustable full-spectrum LED grow lights. The light is composed of several light bars, which was convenient to attach to my frame. The 200W LED light has a PPFD of 500 μmol/m²/s, with variable brightness. This can supply the ideal PPFD for lettuce growth (200-400 μmol/m²/s) and basil growth (300-500 μmol/m²/s).
11. Other tools
Electric saw, drill, ruler, etc.
Step-by-step guide
1. Seedling and placing the seeds in plastic cups
- Control pH: Tap water from home is usually alkaline, so I added lemon juice to adjust the pH level to 5.7 using a pH meter.
- Soak rockwool: Soak rockwool in pH-adjusted water for 2-4 hours to eliminate alkalinity.
- Sow seeds: Create a small hole (a depth of about 3-5 mm) in the middle of each rockwool block and place 1-2 seeds in it.
- Keep it damp: Mist with a spray bottle to maintain the rockwool damp (yet not water-logged).
- Put in seedling tray to germinate: My lettuce germinated in 3 days, and my basil germinated in 5 days.
- Transfer to hydroponic system: Once the seedlings developed 2-3 true leaves and the roots were coming out from the bottom of the rockwool, I transferred them into the planting cups.
- Add growing medium: I added some perlite on top of the rockwool as a support medium.
2. Assemble the iron frame
I constructed the two-layer iron framework, 50 cm tall each. I subsequently utilized thin wood blocks to incline the inlet side of the PVC pipes slightly to provide a 1-3° slope, in a manner that would allow the nutrient solution to flow back on its own.
3. Drill holes in the PVC pipes
Drill holes in the PVC pipes according to the plastic cup size. The shortest growth distance of these plants is 15 cm. Therefore, I drilled 6 holes in each 1-meter-long PVC pipe according to the cup size.
4. Pour in the nutrient solution
As it is the initial growth phase, I used the nutrient solution at 1/4 strength of the regular.
5. Connect the hose
Join the water pump and the inlet of the top PVC pipe with the hose, then join the outlet to the inlet of the second-layer PVC pipe, and then join the outlet to the bucket. I put silicone sealant on all the joints to avoid leakage.
6. Place the cups in the drilled holes of the PVC pipes
Place the plastic cups in the holes made in the PVC pipes so that the roots of the plants reach the water.
7. Install LED lights
I mounted the LED bar grow lights onto the frame with iron wires, with the possibility of changing the wire length to adjust the height in the future. The distance between plants and light should be 30 cm at the seedling stage, 40 cm at the growth stage, and 50 cm for the mature stage. As lettuce and basil are on separate layers, I can have separate working hours for the LED lights. The LED lights meant for lettuce work for 12 hours, and the ones meant for basil work for 14 hours a day.
8. Post-planting maintenance
Whenever I walk by the planting frame, I monitor the water flow. I monitor the pH and EC of the nutrient solution weekly and change the nutrient solution every 2-3 weeks. I harvested mature outer leaves of lettuce after one month of planting. The matured lettuce plants reached a height of approximately 15 cm. Basil took longer to grow and was slightly taller than lettuce. A month afterwards, I was able to perform a second harvest. I anticipate harvesting a minimum of 3 times prior to re-planting.
What is the best indoor vegetable garden system?
So what is the ideal indoor vegetable garden system? I am certain that apart from DIY enthusiasts, most individuals would like to buy a tested and proven indoor gardening system all at once. But most ready-made systems are small-scale.
A good indoor vegetable garden system kit on a small scale should enable the users to harvest in the easiest manner. The users just have to do simple one-touch operations, and the machine will supply the water, oxygen, light, and nutrients required by the plants. The other benefits are that it is compact, easy to clean, and maintain.
AeroGarden Bounty Hydroponic System is one of the most well-liked hydroponic growing kits available. It automatically circulates water and oxygen and delivers nutrients. The LED lights that illuminate it are adjustable in height, and the lighting and water circulation timing can be set by users via an easy-to-use touchscreen interface. It can accommodate the growth of up to 9 different plants at a time and can be used for a variety of herbs, vegetables, and fruits.
Money-saving tips for building an indoor vegetable garden system
Repurposing waste
Most of the materials in the DIY process can be recycled from wastes. For instance, used PVC pipes during house renovations can be reused (avoid very dirty pipes); egg cartons can be used as seedling trays; plastic coffee cups can be utilized as planting cups made of plastic; and old furniture can be reused as wood frames, among others.
System automation
It is efficient and cost-saving to automate the function of water pumps and LED lights. Keeping them running all the time or for a longer period is not just wastage of electricity but also harmful to your plants.
Kratky method
If you want to cultivate a small number of shallow-rooted and short-growth-period plants (like lettuce and basil), you may experiment with the Kratky method. It does away with water pumps and pipe setups, and plants are grown statically in a single bucket. While inexpensive, the method has awful space efficiency—a 5-gallon bucket will usually only be able to fit 1-2 lettuce plants. Also, it is not ideal for bigger plants such as tomatoes.
Frequently asked questions
Q: Are indoor growing systems worth it?
A: An indoor growing system can be expensive and can also entail extra electricity expenses. But with such a system, you can produce healthy and safe agricultural products year-round. But if you want to spend less and have convenient access to cheap but high-quality produce around you, then such a system would not be so valuable. However, if you place a high priority on crop quality, you enjoy gardening, or you need to produce specialty crops that are high-priced (like microgreens or herbs), then a system like this is certainly worth the investment.
Q: What is the easiest vegetable to grow indoors?
A: Lettuce is one of the simplest hydroponic plants indoor to cultivate due to the fact that it has rapid growth and can usually be harvested in 3-4 weeks. It requires moderate light and is extremely versatile, making it ideal for starters.
Related reading