A client recently contacted us regarding their recently placed floodlights, which were not providing security but instead generating complaints from their neighbors. High-end LED fixtures were purchased, however because of their poor positioning, a large portion of the light was squandered lighting the sky rather than their property. Unfortunately, this situation happens far too frequently.
I have a lot of expertise with outdoor lighting systems as a professional lighting engineer, and I’ve discovered that placement is equally as important as light quality.
I’ll offer expert advice in this guide to help you maximize your lighting investment and steer clear of frequent installation errors. Similar to setting up speakers for a concert, LED flood light placement involves strategic placement in addition to power to provide optimal coverage without overpowering any one region.
Key Installation Heights for Different Areas
Entry Points and Access Areas
One of the best ways to discourage residential crime, according to the U.S. Department of Justice, is to have adequate lighting at access points. Install floodlights that are 8–12 feet high and oriented slightly downward at a 30-degree angle for the front door and main entrances. Think of holding a flashlight at chest height instead of eye level to get the best coverage for the majority of single-story dwellings while reducing glare.
Garage and Driveways
Lights should be mounted a little higher in garage areas, usually 10 to 15 feet above the ground. This additional height reduces harsh vehicle shadows and helps light the entire driveway approach.
Property Perimeter and Corners
Appropriate height is essential for protecting the perimeter of your property:
- Residential fencing areas: 8-10 feet
- Open yard spaces: 12-15 feet
- Corner poles (if used): 15-20 feet
Pathways and Walkways
Lower mounting heights are more effective for pathway lighting:
- Covered walkways: 8-10 feet
- Open pathways: 10-12 feet
- Steps and elevation changes: 6-8 feet
Spacing and Coverage
Proper spacing is frequently the key to a successful flood light installation. To provide full coverage, each light should slightly overlap its neighbors, much like when installing tiles.
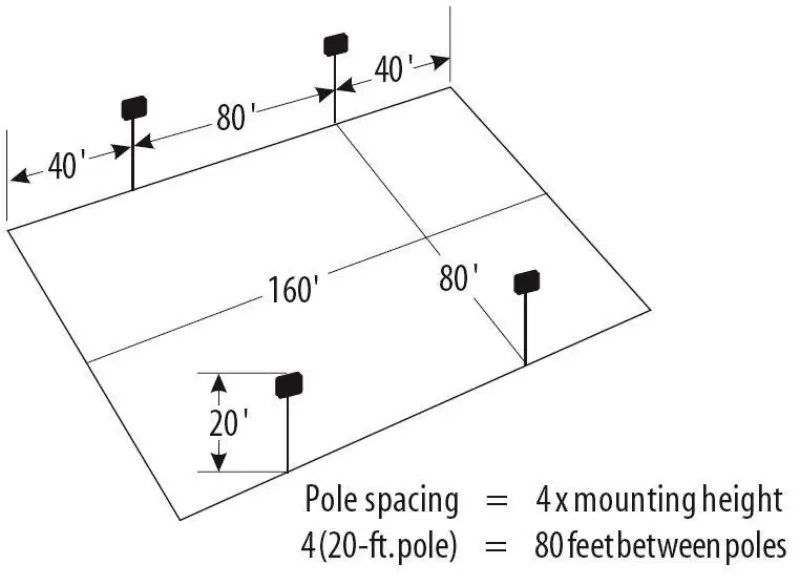
- For pole-mounted lights,we apply the “4X Rule” to calculate the spacing between LED flood lights: Pole Spacing = 4 × Mounting Height
Example: 20 ft poles
Spacing = 4 × 20 = 80 ft between poles

- For wall-mounted flood lighting, here is a straightforward three-step method for residential . Think of a standard entry with a 60-foot front wall. To ensure even coverage, you would install entry lighting first, followed by corner lighting, and then determine whether further fixtures are required.
- Positioning in the corner Place lights ten feet away from every corner. This gets rid of possible hiding places.
- Coverage of the Entrance To guarantee safe access and visibility, place lights on either side of the primary entry points.
- Coverage Gaps If necessary, install extra lighting between entrances and corners. To get rid of dark areas, try to create overlapping light patterns.
- Remember to avoid:
- Over-illumination
- Window glare
- Light spillage onto neighboring properties
Angles and Aiming: The Art of Direction
Choosing the proper flood light angles might mean the difference between energy waste and efficient illumination. Pointing lights directly up or out is the most frequent error I see in home setups, which lowers efficiency and causes light pollution.
The secret is to aim gently downward. This helps focus light on the ground level portions of your property, where it is most required. Consider it similar to using an umbrella in the rain: to get the best covering, lean it slightly forward.
Keep the following guidelines in mind while changing your floodlights:
- Lights should be angled 30 to 40 degrees downward from horizontal.l
- Make sure your target region is struck by the center of the beam.
- Keep lights away from surfaces that reflect light.
- Take into account seasonal modifications for shifting shadow patterns.
Security Integration
Camera Coordination
For the best system performance, flood lights and security cameras must be properly coordinated. Floodlights should not be mounted directly above or next to cameras because this can cause glare that degrades video quality. To achieve efficient cross-illumination, place lights on both sides of the monitored area instead.
Choose mounting locations for the camera that will not be directly exposed to floodlights, and make sure the lit regions are completely covered by the camera’s field of view. To prevent the footage from being washed out, take extra care when aiming cameras at bright lights or reflecting objects.
Security Enhancement
One of the best ways to prevent crime in both homes and businesses is still to have adequate lighting. My experience has shown that well-lighted properties routinely see fewer security incidents than poorly lit ones, however I am unable to provide precise data.
The main goals of strategic placement for security are:
- Eliminating hiding spots
- Illuminating vulnerable entry points
- Establishing overlapping coverage zones
- Keeping the light levels constant
Aesthetic Lighting
Layering various lighting systems is the secret to effective architectural lighting:
- Grazing light on walls with texture
- Light washing on flat surfaces
- Highlighting particular attributes
Common Issues and Solutions
Coverage Gaps and Dark Spots
Although dark gaps between lights are a typical problem, they are easily resolved with proper placement. First, aim floodlights at a downward angle of 30 to 40 degrees, and then make sure surrounding lights have a 20% beam overlap, as both stages are critical. Furthermore, to achieve the best coverage from wall-mounted fixtures, angle them slightly outward at a distance of around 20 degrees from the wall.
Light Control and Pollution
Appropriate installation methods can reduce light pollution and glare. To reduce glare, the downward angle must be at least 30 degrees. Choose warm white lighting (2700-3000K) and turn the brightness down as far as you can. Add hood attachments or glare shields to your fixtures if the problem persists.
Installation Checklist
Before Installation
- Find out the property’s dimensions and key characteristics.
- Indicate possible danger regions, paths, and entry points
- Take into account the positions of cameras if there is a security system
- Check the locations of the power sources
Height Guidelines
- Main entrances: 8-12 feet
- Garage areas: 10-15 feet
- Property corners: 15-20 feet
- Pathways: 8-10 feet
Positioning Essentials
- 30-degree downward angle
- 20% beam overlap between fixtures
- Clear line of sight to target areas
- No direct light into windows
Final Adjustments
- Test angles after dark
- Check that important regions are covered
- Look for any light spills
- Modify brightness settings as necessary
Are you looking for the best flood lights to install in your home? Our skilled staff provides premium LED flood lights and knowledgeable installation advice. Get in touch with us to make sure your lighting system is setup and planned correctly for optimum performance!


