As LED lighting specialists, we routinely hear reports of flickering canopy lights at petrol stations. It’s a common yet important problem that can jeopardize safety and client satisfaction. The root culprit is almost always bad installation, which I’ve witnessed numerous times over my career in commercial LED lighting.
I’ll cover everything you need to know about correctly installing LED canopy lights in this comprehensive guide. Whether you’re a professional installer or a facilities manager monitoring an installation project, this guide will help you avoid typical errors and achieve peak performance.
Let’s start with the most important decision: selecting the appropriate mounting method. There are four primary methods for installing LED canopy lights, and your decision will have a considerable impact on installation difficulty and long-term performance.
Understanding Installation Methods
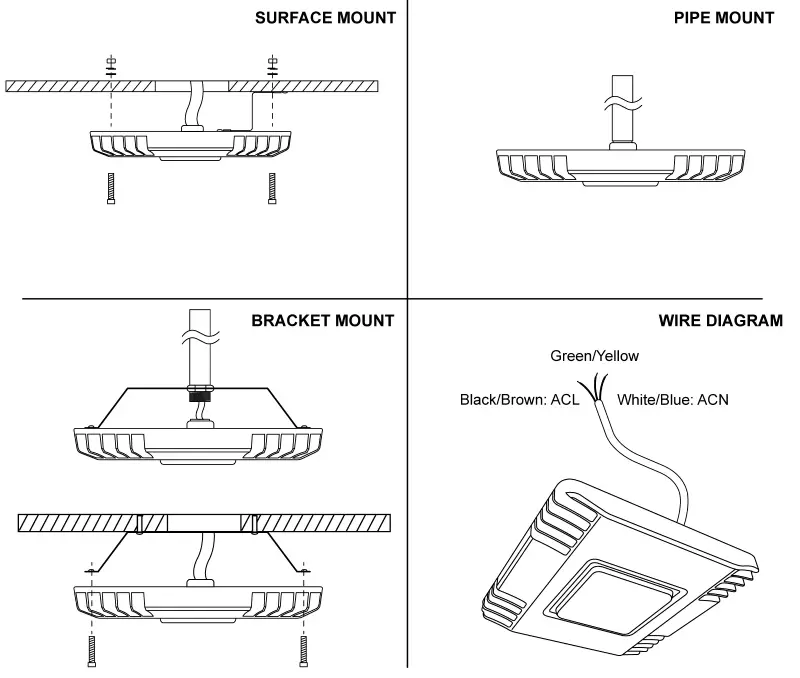
Each of these four mounting choices – recessed, surface, suspended, and bracket – has unique advantages and applications. To help you choose wisely, let’s examine each choice in detail.
Recessed Mounting: The Clean Look Solution
Recessed mounting is especially popular in petrol stations and settings with low ceilings. Its flush finish creates a sleek, integrated look while maximizing overhead clearance.
To complete a recessed installation, you will need:
- Mounting frame kit
- Electric drill and bits
- Wire strippers and connectors
- Level
- Safety equipment (gloves, goggles, hard hat)
- Voltage tester
The installation process consists of five essential steps:
- First, measure and mark the ceiling opening based on the fixture specifications. For most typical canopy lights, this entails cutting a hole measuring around 12×12 inches, though the specifications vary by manufacturer.
- Install the mounting frame and ensure it is properly level. I’ve learned from experience that even a tiny tilt can result in uneven light distribution and water pooling, which can be disastrous in outdoor installations.
- Connect the wiring while the fixture remains on the ground. Make sure there is enough grounding and always follow local electrical codes.Remember that black to black is hot, white to white is neutral, and green/bare to green is ground.
- Lift the fixture into place using the mounting frame’s support brackets. This is where having an extra set of hands comes in handy; managing a large fixture while standing on a ladder is not only difficult, but also dangerous.
- Secure all mounting points and ensure the assembly is waterproof.
Surface Mounting: The Versatile Choice
Surface mounting is the most straightforward installation method and works well in most settings. It’s ideal for retrofit jobs where existing wire is already in place.
The procedure requires less specialized tools than recessed mounting, but good weatherproofing is essential. Here’s what you should know.
When surface installing a canopy light, the most important consideration is choosing the appropriate mounting place. Ensure it’s:
- Close to power supply
- Free from physical obstructions
- Structurally sound enough to support the fixture
- Properly waterproofed (for outdoor installations)
Suspended Mounting: The High-Ceiling Solution
Suspended mounting is ideal for areas with high ceilings, such as warehouses or big commercial spaces, because it improves light distribution and allows for easier maintenance.
When designing suspended installation, the load capacity is a crucial consideration. Here’s a pro tip: The mounting point should be capable of supporting four times the fixture’s weight. A standard 150W LED canopy light weighs roughly 15 pounds, thus your mounting point must support at least 60 pounds.
Bracket Mounting: The Flexible Alternative
Bracket mounting combines the robustness of surface mounting with more adjustability options. It’s especially beneficial when you need to:
- Adjust light angles
- Mount on walls or angled surfaces
- Accommodate irregular ceiling structures

Pre-Installation Essentials
Site Evaluation Requirements
A thorough site assessment is the foundation for any successful installation project. Your first step is to thoroughly inspect the ceiling material and structural condition. Check for any indications of fractures, water damage, or other vulnerabilities that can compromise the installation. In outdoor installations, the ceiling must be able to sustain not only the weight of the fixture but also any additional stress caused by wind loads.
Power Supply Assessment
Power availability and quality have a direct impact on your installation strategy. Inspect the existing electrical infrastructure thoroughly. Check the voltage consistency and make sure the circuit can take the additional load from the new fixtures. In older buildings, you may need to arrange for wiring upgrades or new circuit installations. Recording first voltage readings helps to save future troubleshooting headaches.
Environmental Considerations
Environmental variables play an important part in installation planning. Consider the local weather patterns, such as normal wind speeds and rainfall severity, when planning outside installations. Temperature changes affect both material selection and installation processes. In coastal areas, salt air corrosion necessitates particular precautions. Indoor installations require particular considerations, such as humidity levels in commercial kitchens and dust in industrial environments.
Safety Equipment Preparation
Proper safety equipment is more than simply a legal necessity; it is critical to project success. Make sure your lifting apparatus is rated for the weight of the fixture and the installation height. Personal protection equipment should include hard hats, safety glasses, and nonslip boots as standard. Insulated tools and voltage testers are required when working in an electrical environment. Always keep a well-stocked first aid kit readily available at the installation site.
Installation Safety Standards
Safety is about protecting people and property, not just about following the rules. All professional installations must follow precise electrical safety regulations. The National Electrical Code specifies extensive criteria for canopy light installations, including weatherproofing and electrical connections.
Working at height demands extra care. Always utilize a properly rated ladder or lift equipment, and make sure you have solid footing. Weather can significantly affect safety, especially for installations that are outside. We never install during rain or heavy winds because these conditions pose needless hazards.
Before you undertake any electrical work, turn off all electricity. Even if you are confident that the circuit is dead, use a voltage tester to ensure that the power is turned off. Experience has shown me that thinking a circuit is turned off can result in dangerous situations.
Common Installation Challenges
Waterproofing Challenges
Water penetration remains the most serious threat to outdoor lighting installations. Proper sealing techniques can be the difference between a fixture that lasts for years and one that fails early. Our crew applies high-quality silicone sealant to all attachment locations and ensures that suitable drainage channels exist.
Multiple Fixture Alignment
Alignment challenges frequently arise during multiple fixture setups. Making a chalk line guide on the ceiling before mounting helps to keep straight lines and adequate spacing. This basic procedure saves significant time during changes.
Legacy Wiring Issues
Wiring problems are common in older buildings. When dealing with old wiring, it is critical to ensure that the circuit can carry the new fixture’s load. Sometimes, what appears to be a simple replacement turns into a wiring improvement effort.
Post-Installation Procedures
Initial Testing Protocol
After the mounting is finished, proper testing is vital. We always run a 24-hour burn-in test to identify any potential concerns. This involves checking for:
- Water tightness in various weather situations
- Light distribution patterns
- Proper voltage at the fixture
- Any unusual sounds or vibrations
Documentation and Record Keeping
Long-term maintenance requires thorough documentation. Keeping accurate records of installation dates, wire connections, and any revisions is extremely useful for future repair calls.
Professional Installation Tips
Wire Management Best Practices
With years of field expertise, I’ve developed a number of strategies that improve installation efficiency and reliability. When connecting cables, allow extra slack for future maintenance – around 6 inches is usually enough. This minor detail makes a significant effect during future servicing.
Temperature Compensation
Temperature variations cause the mounting materials to expand and compress. Always accommodate for this by not overtightening the mounting hardware. Proper torque enables natural movement while retaining security.
Final Installation Insights
Do you recall the flickering lights we mentioned at the beginning? A properly placed LED canopy light should work perfectly for years. To make sure your installation lasts, take your time and heed these suggestions.
Our skilled technical team can help you choose the correct LED canopy lights for your project. With each purchase, we include extensive installation instructions targeted to your unique use. Our technical support staff is always on hand to address any installation-related inquiries, and our products are designed to be simple to install. To learn more about our LED light assortment, please visit www.casyoo.com or contact us personally.
[Important Notice]
Note that this installation guide is only meant to be used as a general reference. Installation requirements and electrical rules vary depending on region and application type. Before commencing any installation work, always consult with local professional electricians and ensure that you are following regional electrical codes. The success of your installation is greatly dependent on local conditions, building architecture, and product specifications.


